Dumping Stealers from it's AutoIT loader
Intro
I have analysed two files which I downloaded from Malware Bazaar. These two files dropped AgentTesla. According to malpedia AgentTesla is:
“A .NET based information stealer readily available to actors due to leaked builders. The malware is able to log keystrokes, can access the host’s clipboard and crawls the disk for credentials or other valuable information. It has the capability to send information back to its C&C via HTTP(S), SMTP, FTP, or towards a Telegram channel.”
This is a high level overview of what the loader does. I will not go into great detail as my goal for analysing the sample was just to dump the final payload. Below is the infection chain for this sample:
 Figure 1: Infection Chain
First of all the file is distributed somehow either through malspam or another technique. The file distributed is an AutoIT executable file. AutoIT is a scripting language used for the windows OS, often used for automating repetitive administrative tasks. Shellcode is executed which allocates some memory for the decoded AgentTesla payload which is then dropped.
The two files which exhibit this behavior are:
1
2
SHA256: c8e506aef378f6e96c8b30b356338187bba6cbc7b46affb69d53614cc0784a6b
SHA256: 1a4e9865bdd049e0af9744de415b4bca7da2752ea21ce6c547f37f962b5e6aa9
(More files are available that use this technique I will cover this later on)
In my examples I will use the first file.
Analysis
The first stage is actually understanding how the infection chain occurs and how the malware works. This will demonstrate how I got to the final payload.
1
file: c8e506aef378f6e96c8b30b356338187bba6cbc7b46affb69d53614cc0784a6b
The first thing I like to do is to open the file in detect it easy which allows us to explore the PE file. This will attempt to identify what the file was compiled with and any common packers it uses. It also allows us to explore the entropy and other interesting things that as an analyst we want to know. 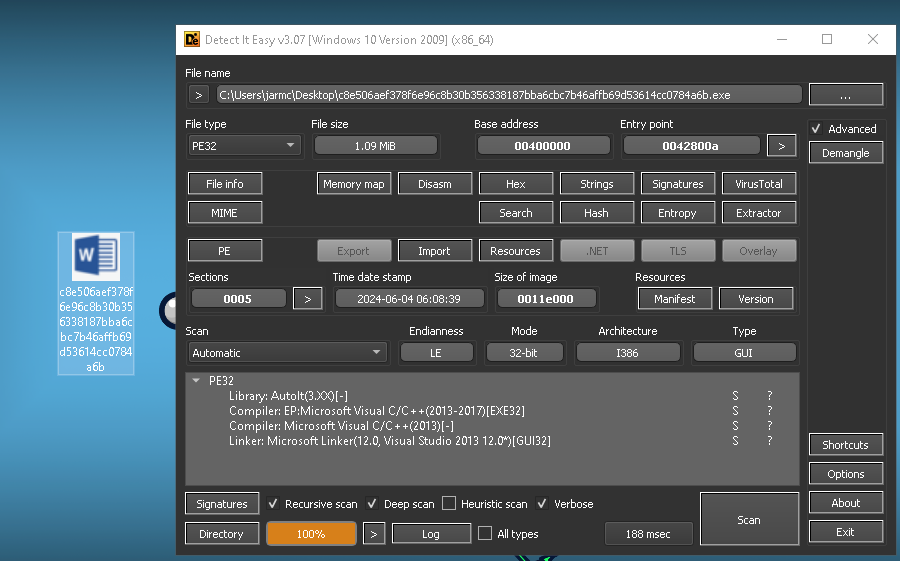 Figure 2: Detect It Easy Results
As we can see it is telling us that it is an AutoIT executable. Obviously, I wanted to know how we could tell this manually without having to rely on detect it easy. By going to the GitHub page of detect it easy and searching for their AutoIT detection script we can see:
 Figure 3: Detect It Easy Github
This shows that it first looks for a SCRIPT entry in the resource table. If this is true then AutoIT version 3.XX has been detected. Otherwise, it attempts to compare some bytes to also detect if the binary is an AutoIT script.
 Figure 4: Script entry in the resource table
Here we can see that it is an AutoIT compiled script. So now all we need to do is decompile the script. Thankfully, this tool already exists and is called Exe2Aut. This will partially execute the file and so it is very important to use this in a VM. Dragging and dropping the binary into Exe2Aut produces 3 files. 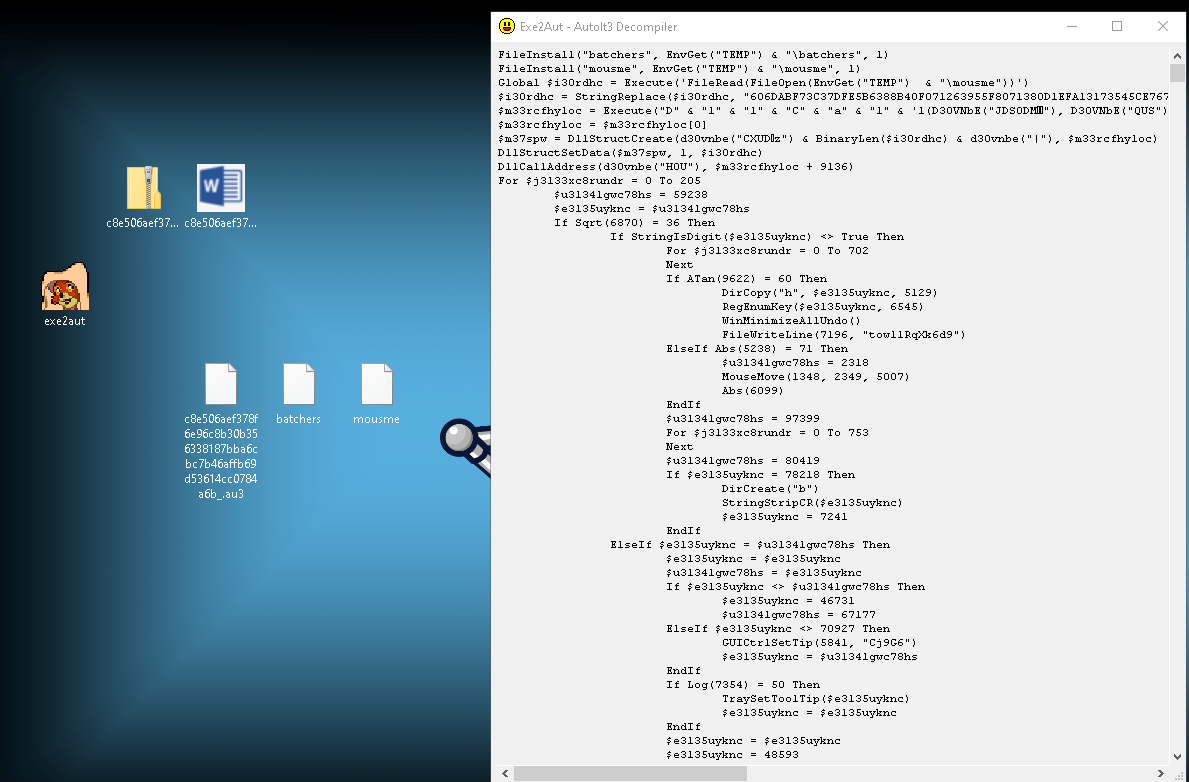 Figure 5: Files from exe2aut
Three files have been dropped: the script (.au3), batchers(Encrypted Agent Tesla) and mousme (Shellcode).
So now we have the original script and we need to analyse it. I will open it in Notepad++ as I don’t have sublime text installed on this VM. But honestly any text editor will do you fine.
 Figure 6: The script
The first 9 lines are what we are interested in. The rest of the script essentially does nothing of interest to us.
The first 2 lines use FileInstall which includes and installs a file with the compiled script. We can see that these two files will be included in the TEMP folder. So essentially this drops two files.
The third line then opens the mouseme file and reads it’s bytes. After that it replaces a sequence of bytes with nothing. I assume this is done to avoid signature detection on the file. As the bytes can be random.
Now it gets interesting we see a string DllCall with what seems to be a sequence of encrypted strings. DllCall will call a function. Therefore, we need to understand what this function is. Before every string there is a call to D30VNbE which is a function call to decrypt that sequence of strings.
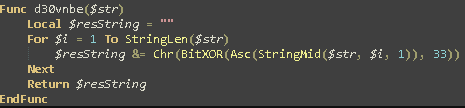
Figure 7: String Decryption function (semi cleaned up)
Clearly we can see that all it does is iterate through each character and XOR it with the key 33. So all we need to do is take each string and XOR it with 33 to get the original value back. We can do this manually with cyber chef or another tool. But lets automate this with python.
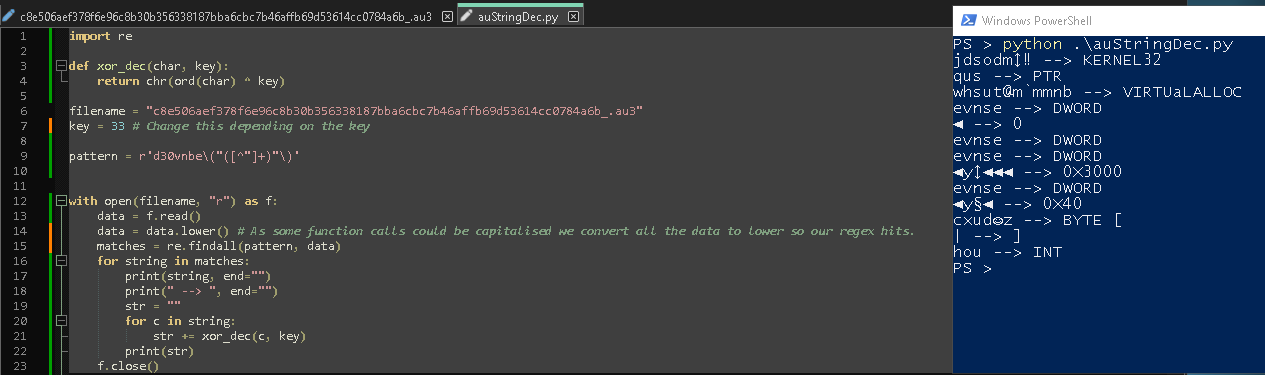 Figure 8: Python script to decode strings
Obviously, we could just make the script replace the strings in the file. But when I analysed the file originally this is what I did. I’ll leave that as a challenge for you. Let’s now clean up the file with the decoded strings and rename some of the functions.
 Figure 9: Cleaned up script.
It now becomes clear what is happening. ( If you don’t understand I recommend looking up all the functions on the AutoIT docs).
First two files are dropped in the temp folder. The second one is then opened and read. We then replace some bytes at the start of the file. After that some memory is allocated in which we set the mousme file contents to. Then the address at $pAlloc + 9136 is called (We can assume this is the entry point).
So what we need to do now is replace the bytes in the mousme file with nothing and investigate what the function is doing at 9316.

Figure 10: Bytes after they have been removed
Here we can clearly see it is a hexadecimal file. Lets decode this hexadecimal using python.
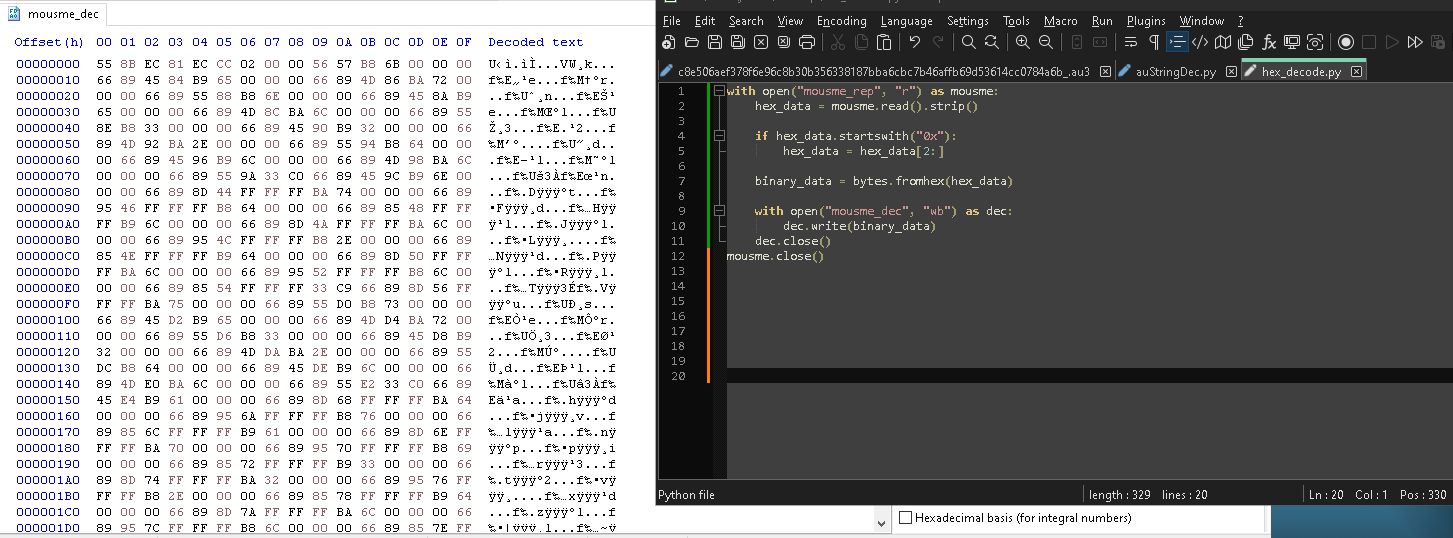 Figure 11: Decoded file
Now looking at this file it really gives us no indication what it is. Detect It Easy tells us nothing. But I assumed it was shellcode as we are calling the address 9136. So I opened it in Ghidra to analyse it. Ghidra won’t be able to tell what compiler was used so we have to tell it what compiler was used. Earlier we saw that the binary was compiled with 32-bit and visual c/c++ compiler and so I will choose this as it’s our best bet.
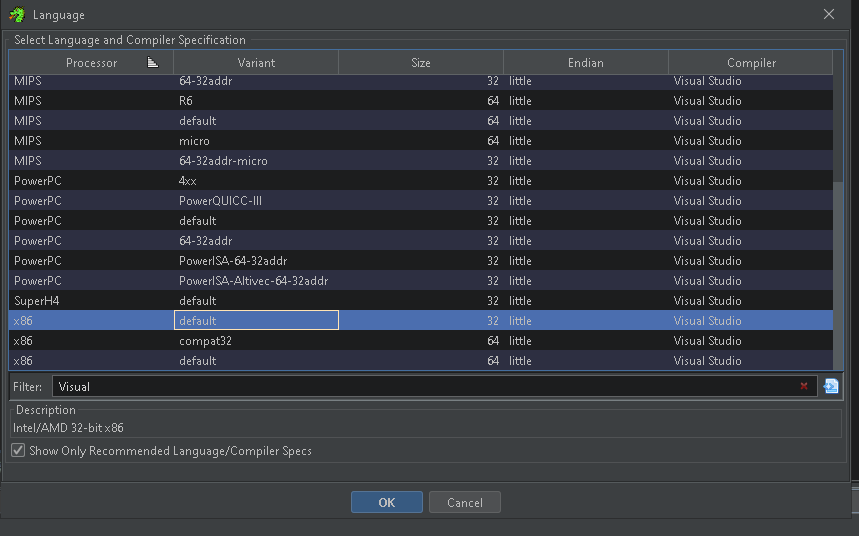 Figure 12: Ghidra compiler option
During my analysis I used a really good tool called blobrunner from OALabs along with x32dbg for dynamic analysis in combination with Ghidra. I’m going to focus on Ghidra in this blog.
After analysis has completed we want to go to the offset called in the script (9136). 9136 is 0x23B0 so we just go to that offset. Now I am going to give a high level overview of what this does. First it uses stack strings to obfuscate the XOR key and batchers file name.
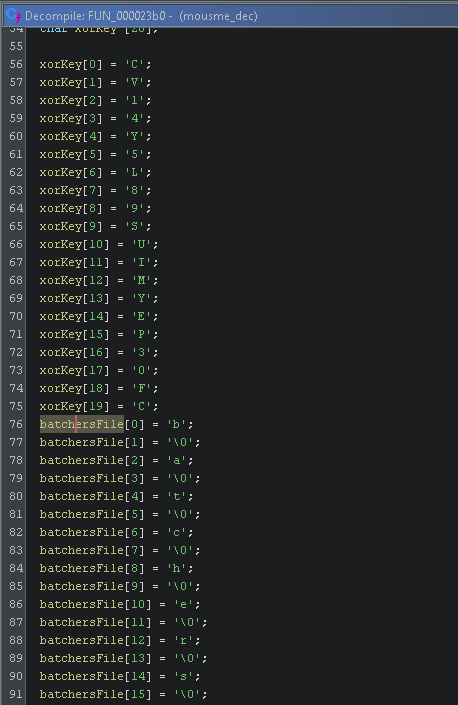
Figure 13: Ghidra xorkey and filename
It then calls a function which resolves API’s dynamically using the PEB (Process Environment Block).
We can then see this XOR key being pushed onto the stack before a function is called.
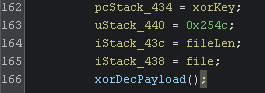
Figure 14: Xor Function
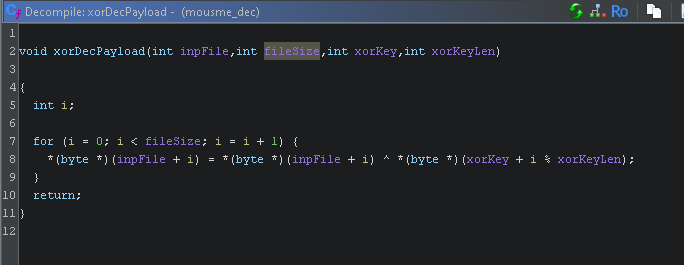
Figure 15: Common XOR decryption.
So now what we need to do is decrypt the batchers file using this XOR key.
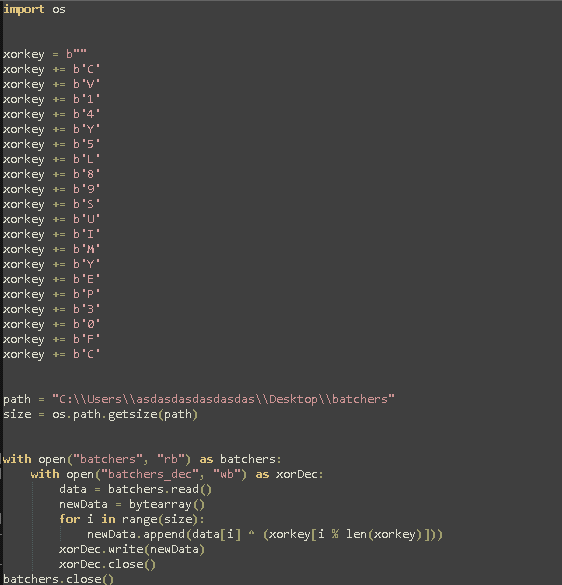
Figure 16: Python script to XOR decode payload
The decrypted payload should be a .NET binary. I will use de4dot to help with renaming some of the obfuscation and make it easier to use within dnspy. After running it through de4dot and openning it up in dnspy. We can look through the classes and find the config.  Figure 17: First File’s config
Repeating the same steps in our second file we can see: 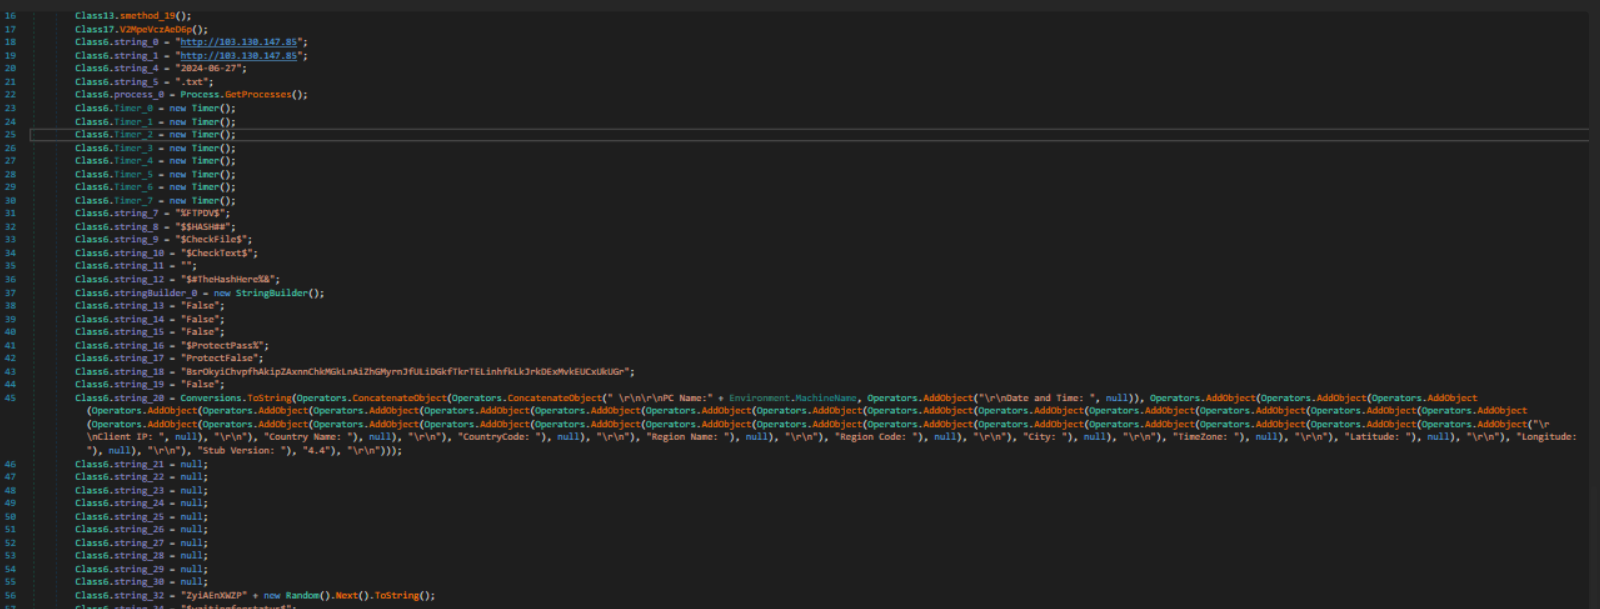
Figure 18: Second File’s config
Now clearly the config files are different one uses FTP and the other uses SMTP.
Further Analysis
After this I wrote a script that combined all the scripts we have used to get to the final payload. It is available at the end of this blog and will automatically dump the final payload.
I wondered how many binaries had been detected using this method and so I wanted to figure out a way to detect it. I chose to look up on malware bazaar the import hash of the binary and over 1000+ results came back. However, a lot of them had other malware tags.
NOTE: Using the import hash could also give us legit binaries as the import hash will be the same for all binaries that have been compiled from an AutoIT script to an executable file.
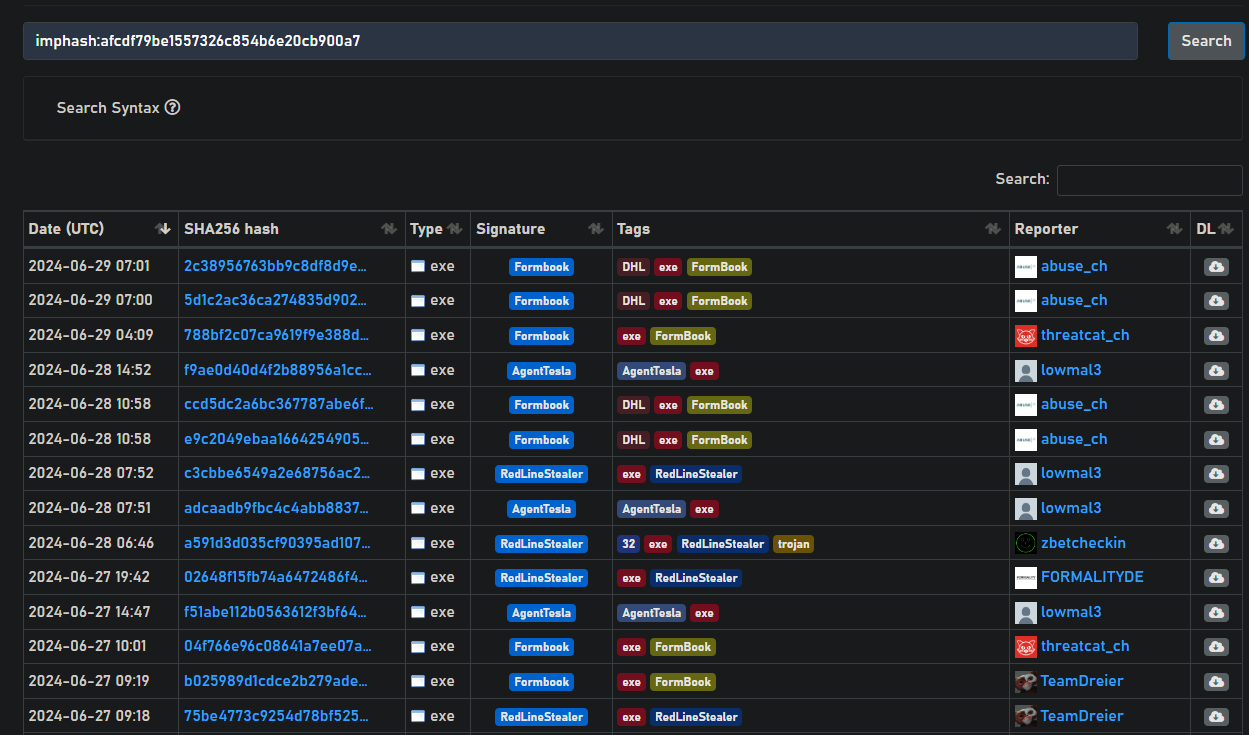 Figure 19: Snippet of malware samples with the same import hash
As you can see only 2 have the AgentTesla tag. So I wanted to investigate are the tags just wrong? Or is this technique used commonly by actors. So I downloaded 10 samples with the wrong tags from random pages. My script managed to dump 7/10 final payloads.
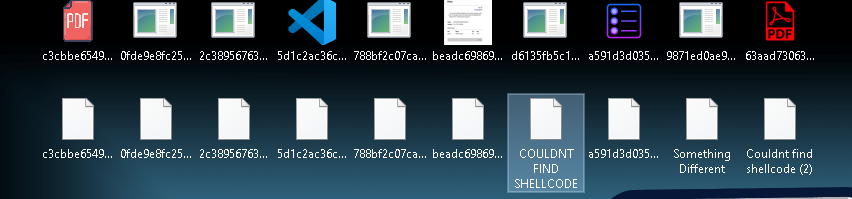 Figure 20: Files with the final payloads
First we are going to explore the ones that got dumped.
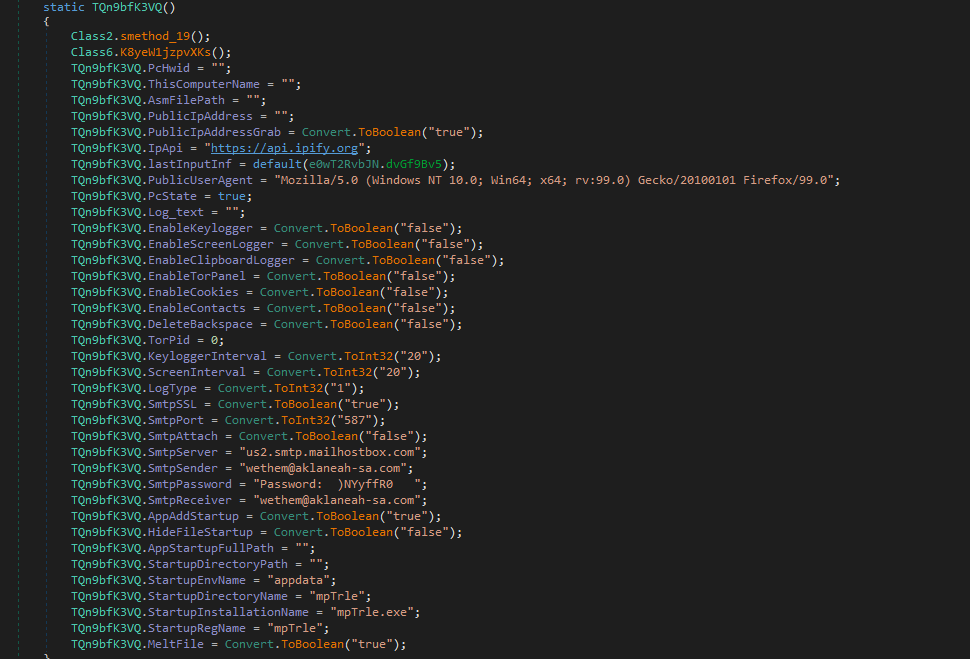 Figure 21: Config for first file
We can find the config exactly how we found the others and so we can pretty confidently say this is AgentTesla.
The second file we get told is an executable 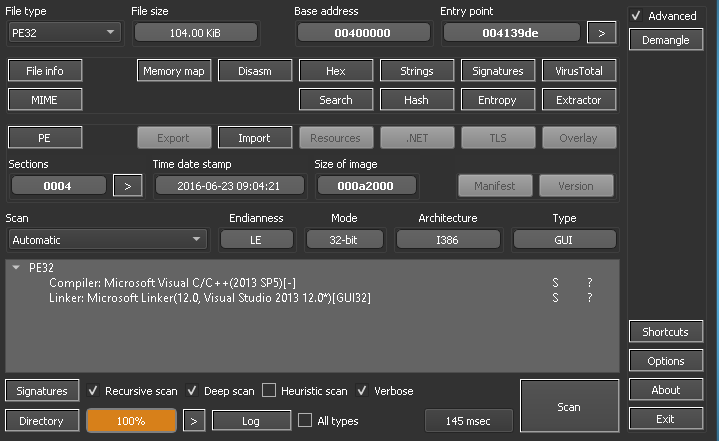
Figure 22: DIE output for second file
Without diving into the file I decided I would just upload it to virustotal. Looking at the strings I had a pretty good idea it would be some kind of stealer.
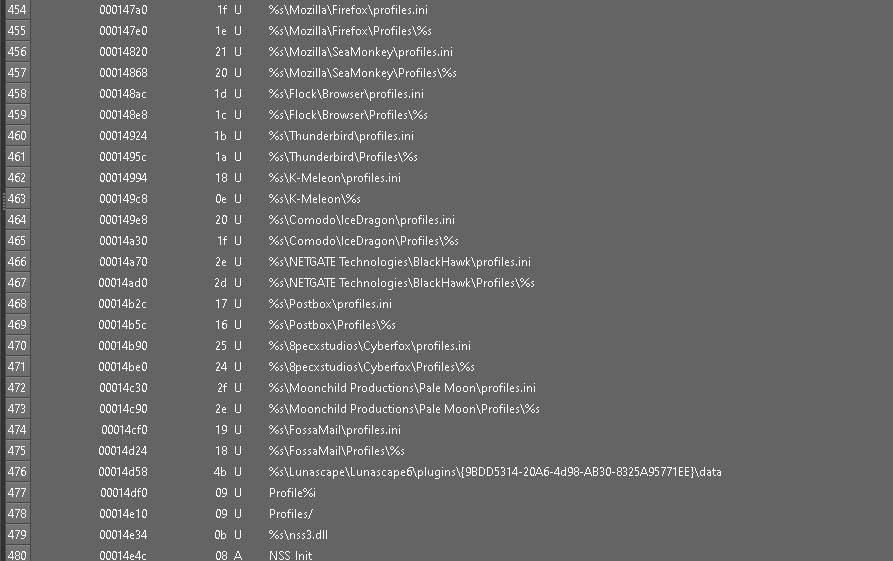 Figure 23: Strings output
This is Lokibot. So now we know that either this loader is being distributed or copied by other actors.
The next 3 files are all agent tesla binaries the 6th binary is remcos rat which shows even more evidence that this is not just native to AgentTesla.
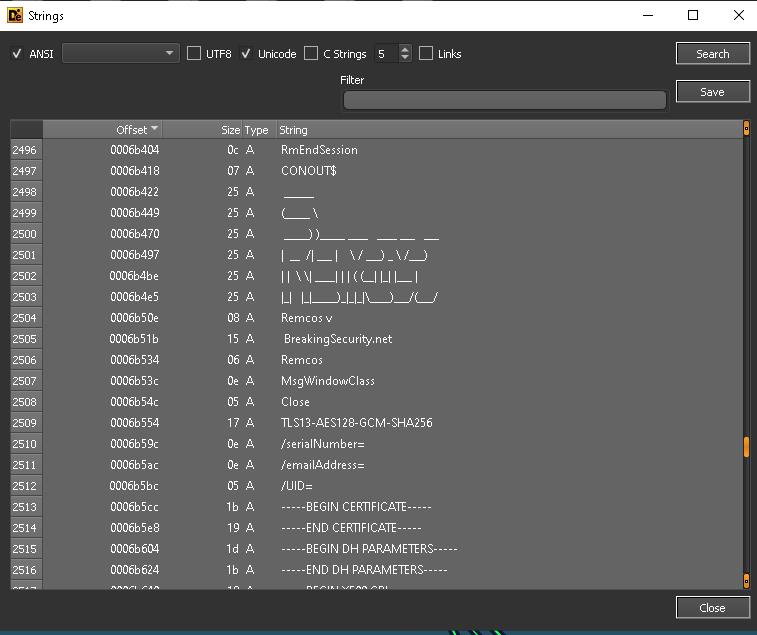 Figure 24: Strings output of remcos rat
The 8th binary is redline stealer. As told to us by VirusTotal. The rest of the binaries use AutoIT but use a different script and therefore we cannot automatically dump the final payload. I will not dive into these scripts in this blog but maybe will do in the future. After looking through a load of blogs and writeups of AutoIT loaders and AgentTesla I could not find much information about this loading technique. The one blog I found that uses the same technique is described here. I would assume that this is a loader that is distributed online which allows anyone to embed a payload and is not native to AgentTesla.
Python code to dump final payload
This code is nowhere near perfect but should be able to dump the final payload for binaries that use this technique. Make sure to use this inside a virtual machine. You will also need to grab a copy of exe2aut.
NOTE: I observed almost all binaries using 0x23B0 as their entry point to the shellcode. If in your case the entry point is different just change 0x23B0 to whatever your entry point is.
1
2
3
4
5
6
7
8
9
10
11
12
13
14
15
16
17
18
19
20
21
22
23
24
25
26
27
28
29
30
31
32
33
34
35
36
37
38
39
40
41
42
43
44
45
46
47
48
49
50
51
52
53
54
55
56
57
58
59
60
61
62
63
64
65
66
67
68
69
70
71
72
73
74
75
76
77
78
79
80
81
82
83
84
85
86
87
88
89
90
91
92
93
94
95
96
97
98
99
100
101
102
103
104
105
106
107
108
109
110
111
112
113
114
115
116
117
118
119
120
121
122
123
124
125
126
127
128
129
130
131
132
133
134
135
136
137
138
139
140
141
142
143
144
145
146
147
148
149
150
151
152
153
154
155
156
157
158
159
160
161
162
163
164
165
166
167
168
169
170
171
172
173
174
175
176
177
178
179
180
181
182
183
184
import pefile
import argparse
import hashlib
import os
import subprocess
import re

# Calculates SHA256 hash of the binary imports
def calcImportHash(pe):
    imports = []

    if hasattr(pe, 'DIRECTORY_ENTRY_IMPORT'):
        for entry in pe.DIRECTORY_ENTRY_IMPORT:
            dll_name = entry.dll.decode('utf-8').lower()
            for imp in entry.imports:
                if imp.name is not None:
                    func_name = imp.name.decode('utf-8')
                else:
                    func_name = f"ord{imp.ordinal}"

                imports.append(f"{dll_name}.{func_name}")

    imports.sort()
    concat_imports = ','.join(imports)

    md5_hash = hashlib.md5(concat_imports.encode('utf-8')).hexdigest()
    return md5_hash

# Determines if the file is an AutoIT file
def checkFile(path):
    pe = pefile.PE(path)

    if calcImportHash(pe) == "a37715a04317ddc4d5f6414f5911b5ee":
        print("[+] Binary has the correct import hash")
        return True

    for resource in pe.DIRECTORY_ENTRY_RESOURCE.entries:
        for entry in resource.directory.entries:
            if entry.name is not None:
                if(entry.name.__str__() == "SCRIPT"):
                    return True

    return False

# Extracts the XOR key from shellcode using pattern scanning
def extractXorKey(data):
    start_pattern = b"\xc6\x45"
    end_pattern = b"\x00\x00\x00\x66\x89"
    xorKeyBytes = ""
    start_index = 0

    while True:
        start_pos = data.find(start_pattern, start_index)
        if start_pos == -1:
            break

        end_pos = data.find(end_pattern, start_pos + len(start_pattern))
        if end_pos == -1:
            break

        extracted_string = data[start_pos + len(start_pattern) + len(b"\x00")]

        xorKeyBytes += hex(extracted_string)

        start_index = start_pos + len(start_pattern) + len(b"\x00")

        if start_index == end_pos:
            break

    xorKeyBytes = xorKeyBytes.replace("0x", "")
    xorKeyBytes = bytes.fromhex(xorKeyBytes)
    xorKey = xorKeyBytes.decode('utf-8')
    return xorKey

# XOR's the file to get the payload
def xorPayload(key, payload, fileName):
    size = os.path.getsize(os.getcwd() + "\\" + payload)

    with open(payload, "rb") as batchers:
        with open(fileName + "_dec", "wb") as xorDec:
            data = batchers.read()
            newData = bytearray()
            for i in range(size):
                newData.append(data[i] ^ (ord(key[i % len(key)])))
            xorDec.write(newData)
            xorDec.close()
    batchers.close()
    return payload+"_dec"

# Extracts the two file names and dumps the final payload
def extractConfig(path, exeautPath):
        print("[*] Checking File...")
        if checkFile:
            fileName, fileExt = os.path.splitext(path)
            try:
                print("[*] Please close exe2Aut window")
                subprocess.run([exeautPath, path], check=True, creationflags=subprocess.CREATE_NO_WINDOW)
                print("[+] Dumped au3 script")
            except subprocess.CalledProcessError as e:
                print("error ", e)

            with open(fileName + "_.au3") as script:
                data = script.read()
                pattern = r'& "\\([^"]+)"\)'

                match = re.search(pattern, data)
                if match:
                    shellcodeFile = match.group(1)
                    print("[+] Found Shellcode File ")

                    pattern = r'StringReplace\([^,]+,\s*"([^"]+)"'
                    match = re.search(pattern, data)
                    if match:
                        hexToRemove = match.group(1)
                        print("[+] Found hex to remove")

                        pattern = r'FileInstall\(\s*"([^"]+)"'
                        match = re.search(pattern, data)
                        if match:
                            print("[+] Found encoded payload")
                            encodedPayload = match.group(1)
                            if encodedPayload == shellcodeFile:
                                encodedPayload = input("Please type the name of the 2nd file dropped by exe2aut that is not " + shellcodeFile)

                            with open(shellcodeFile, "r") as shellcode:
                                nd = shellcode.read()
                                newString = nd.replace(hexToRemove + "0x", '')
                                binary_data = bytes.fromhex(newString)
                                with open("decoded", "wb") as f:
                                    f.write(binary_data)
                                f.close()
                            shellcode.close()

                            xorKey = ""
                            with open("decoded", "rb") as decShellcode:
                                decShellcode.seek(0x23B0)
                                moredata = decShellcode.read()
                                xorKey = extractXorKey(moredata)
                            decShellcode.close()
                            print("[+] Found XOR key")
                            decPayload = xorPayload(xorKey, encodedPayload, fileName)
                            print("[+] Decoded payload " + decPayload)
                            os.remove(shellcodeFile)
                            os.remove(encodedPayload)
                            os.remove("decoded")
                    else:
                        print("[-] Couldnt find hex to remove")
                else:
                    print("[-] Couldnt find initial shellcode")
            script.close()
            os.remove(fileName + "_.au3")
        else:
            print("[-] Could not detect AutoIT")

def main():
    parser = argparse.ArgumentParser(prog="AutoIT Loader Unpacker")

    parser.add_argument('-f', '--file')
    parser.add_argument('-e2a', '--exe2aut', help="Path to the exe2aut binary")
    parser.add_argument('-c', '--check', action="store_false", help="Check if this file can be extracted")


    args = parser.parse_args()

    if args.file:
        if args.exe2aut:
            if args.check is False:
                if checkFile(args.file):
                    print("[+] File is a AutoIT binary")
                    return
                else:
                    print("[-] Could not detect AutoIT")
                    return
            else:
                extractConfig(args.file, args.exe2aut)
        else:
            print("[-] Please provide the path to exe2aut")
    else:
        print("[-] Please provide a file")
        return


if __name__  == "__main__":
    main()